Most of organization scans their servers with System Center Endpoint Protection. In an effort to improve our security and reduce our risk of an infection on various servers in organization. SCCM, the tool that manages the Anti-malware environment, is set up to search for servers with SharePoint Server installed
Mostly quick scans will scheduled daily and should complete within approximately 15 minutes. This will help ensure the scan is completed before working hours. The Quick scan only scans resident memory and critical OS files. Also, All incoming files will be scanned automatically to protect systems after the full scan is completed and to compliment the Quick scans.
To minimize performance impacts mostly Microsoft and vendors recommends some file and folder exception. As SharePoint Administrator, IT team might ask you to provide certain folders that may have to be excluded from antivirus scanning when you use file-level antivirus software in SharePoint.
More information can be found at below link for SharePoint Servers. Refer below article and prepare the List of folders for each farm admin account and Search Index folder on Search Servers.
https://support.microsoft.com/en-us/help/952167/certain-folders-may-have-to-be-excluded-from-antivirus-scanning-when-y
Thursday, May 10, 2018

Wednesday, March 21, 2018
SharePoint 2013 - Execute Search Query using Powershell for large number of results
I recently came across the need to provide a report of specific Content Types documents using SharePoint 2013 Search. Content Search Web Parts does this, however, there is no out-of-the-box method to export your search results to a spreadsheet. you can definitely copy from page to .CSV file but this will not help if there are more items (in thousand's). If your search yields anything above just a couple of pages you’re looking at a lengthy, time consuming, and very boring, task.
Of course there is way, PowerShell to the rescue!. PowerShell saves my lot of time. I will rather spent some time to create powershell so that it will be useful in other senarios too. However, with my latest engagement being primarily focused on the administration side of things, I had finally sat down and really dug into PowerShell, something I’ve been meaning to do for quite some time. PowerShell makes short work of tasks such as the one demonstrated here.
Remember you wil get most of the example on the internet which has powershell to export the search results into csv file. but believe me guys these examples always assumes that your results are less than 10-20 rows. what if you have thousands of rows which need to be exported? the answer is still powershell but there is smart way to use it.
After doing some research I came up with the following reusable script:
Step 1 : Scripts Parameter
#input parameters
param
(
[string] $siteUrl
= "https://sharepointdev.company.com", # Web Application
URL
[string] $outputPath
= ".", # Log File
[string] $queryText
= 'ContentTypeId:0x0101009E3C6E67A2CF4261807753FA8CF19B5F*'
)
Step 2 : Add Snapin
if ((Get-PSSnapin
-Name "Microsoft.SharePoint.PowerShell"
-ErrorAction SilentlyContinue)
-eq $null
)
{
Add-PsSnapin
"Microsoft.SharePoint.PowerShell"
}
Step 3 : Set File Path
$csvFilePathTo = "$outputPath\Documents.csv"
$logFilePathTo = "$outputPath\Documents_Log.txt"
set-variable -option
constant -name
filename -value
$csvFilePathTo
set-variable -option constant
-name outputFile
-value $logFilePathTo
# Log File
Step 4 : Set keywordquery object
# new keywordquery object
$site = New-Object Microsoft.SharePoint.SPSite
$siteUrl
$query = New-Object Microsoft.office.Server.Search.Query.KeywordQuery
$site
# set ResultTypes
$query.ResultTypes
= [Microsoft.Office.Server.Search.Query.ResultType]::RelevantResults
# set number of items to return
$currentIndex = 1
#$query.StartRow = $currentIndex
$query.RowLimit
= 500
$query.TrimDuplicates
= $true;
$query.Timeout
= 600000;
#10 Minutes
write-host 'Timeout: '
$query.Timeout
# actual string you are searching for
$query.QueryText
= $queryText
Step 5 : Set the Properties you want to retrieve
# get all the extended properties for query
$selectProperties = $query.SelectProperties;
$selectProperties.Add(“SiteName”)
$selectProperties.Add(“Path”)
$selectProperties.Add(“ListName”)
$selectProperties.Add(“Title”)
$selectProperties.Add(“Author”)
$selectProperties.Add(“AuthorOWSUser”)
$selectProperties.Add(“DisplayAuthor”)
$selectProperties.Add(“PostAuthor”)
$selectProperties.Add(“Created”)
$selectProperties.Add(“CreatedOWSDate”)
$selectProperties.Add(“ModifiedBy”)
$selectProperties.Add(“LastModifiedTime”)
$selectProperties.Add(“ModifiedOWSDate”)
$selectProperties.Add(“ContentTypeId”)
Step 6 : Get results first time in temporary table
# execute the query
try
{
$resultTableColl
= $query.Execute()
}
catch
{
# update log
files
"timeout
Error Occured `r`n" | Out-File $outputFile
-Append
$resultTableColl
= $query.Execute()
}
# get the results back
$resultTable = $resultTableColl.Item([Microsoft.Office.Server.Search.Query.ResultType]::RelevantResults)
write-host $resultTable.TotalRowsIncludingDuplicates
# make a DataTable from the results
$resDataTable = $resultTable.Table
Step 7 : Loop through the results till all results traversed
###########################################################################
# Loop through the results and append all results into
$resDataTable
###########################################################################
do
{
#write-host
$resultTable.TotalRows
$currentIndex
+= $resultTable.Table.Rows.Count
write-host $currentIndex
$query.StartRow = $currentIndex
# execute the
query
$resultTableColl
= $query.Execute()
# get the
results back
$resultTable
= $resultTableColl.Item([Microsoft.Office.Server.Search.Query.ResultType]::RelevantResults)
if($resultTable.Table.Rows.Count -le 0)
{
break;
}
else
{
# make a
DataTable from the results
$resDataTable.Merge($resultTable.Table)
}
# use below
block is for testing purpose only
# if results are more than 500 then this loop will run only one time
# if results are more than 500 then this loop will run only one time
if($resDataTable.Rows.Count -gt 500)
{
# Un-comment the next line to get only <=1000 results
#break;
# Un-comment the next line to get only <=1000 results
#break;
}
}while($resultTable.TotalRowsIncludingDuplicates -gt $resDataTable.Rows.Count)
write-host "Total
Rows Found" $resDataTable.Rows.Count
Step 8 : Traverse the table object to creates rows for csv to export
# since we have data lets format as per o/p we needed.
$RArray = New-Object System.Collections.ArrayList
$urlArray = $null
foreach($row
in $resDataTable.Rows)
{
$urlArray
= $row["Path"] -split '/'
$DocURL
= $row["Path"]
$listTitle
= $row["ListName"]
$website
= $row["SiteName"]
$itemName
= $row["Title"]
$varcreatedBy
= $row["AuthorOWSUser"].tostring().Split("|");
# Add our
data to $CTDBObject as attributes using the add-member commandlet
# Create a
new custom object to hold our result.
$CTDBObject
= new-object
PSObject -Property
@{
DocumentId = [int]($row["DocId"].tostring() )
SiteUrl = $website
Site = $siteName
DocumentUrl = $DocURL
ListName = $listTitle
DocumentName = $itemName
}
$RecordNumber
= $RArray.Add($CTDBObject)
$CTDBObject
= $null
}
Step 9 : Export the data to CSV file
Save step 1 to 9 in one file name as "SearchDocuments.ps1". you can either execute ps1 file and specifiy parameter on the fly or else create a batch file and specify the parameter in that file.
e.g.
Batchfile name: SearchDocuments.bat
Batchfile contents:
#############################################################################
# Export data in excel
$RArray | Select DocumentId, SiteUrl, Site, DocumentUrl, ListName, DocumentName
| Export-csv
$filename
-NoTypeInformation
Save step 1 to 9 in one file name as "SearchDocuments.ps1". you can either execute ps1 file and specifiy parameter on the fly or else create a batch file and specify the parameter in that file.
e.g.
Batchfile name: SearchDocuments.bat
Batchfile contents:
SET ThisScriptsDirectory=%~dp0
SET SiteURL=https://sharepointdev.company.com
SET Enivironment=Prod
SET outputDirectory=\\sharepointdev.company.com\reports
PowerShell -NoProfile
-ExecutionPolicy Bypass
-Command "&
'%ThisScriptsDirectory%SearchDocuments.ps1' '%SiteURL%' '%outputDirectory%'
'ContentTypeId:0x0101009E3C6E67A2CF4261807753FA8CF19B5F*' " ;
Friday, February 16, 2018
SharePoint 2013 - SharePoint Farm Solution WSP not getting deployed in all servers.
SharePoint Farm solution installation enables developers to package custom farm solutions and administrators to deploy those farm solutions in a straightforward, safe, and consistent manner.

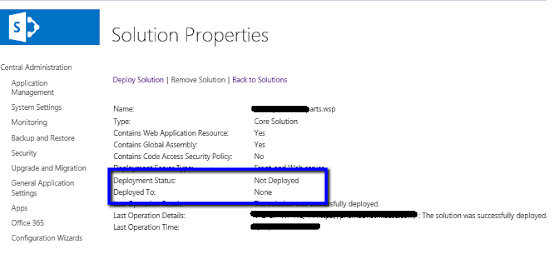
we sometimes see failures when trying to copy assemblies to the Global Assembly Cache (GAC) or remove assemblies or other files from the bin or 14 or 15 hive during solution retraction and/or deployment. Sometimes we get the issue where the WSP is getting installed only on one of the WFE or App Servers.
Certainly, There is a possibility to deploy the solution on only one server using "-Deploy LOCAL" property. But this is for troubleshooting step and not recommended for Production. If i don't use LOCAL property, then solution should get deployed to all WFEs and App servers (if any).


To avoid this error, Please check on following things:
- Restart the SharePoint 2010/2013 Administration service on all of the Web Front End servers (all servers on the farm where the Foundation Web Application service is running).
- Make sure Timer Service is running fine
- Farm-level SharePoint Foundation Timer job was only visible from PowerShell.
- Run the following script to get the status of Internal SharePoint Foundation Timer Job
if ((Get-PSSnapin "Microsoft.SharePoint.PowerShell" -ErrorAction SilentlyContinue) -eq $null){Add-PSSnapin "Microsoft.SharePoint.PowerShell"}$farm = get-spfarm$ss = $farm.Servers | ? {$_.Role -notlike "Invalid"}foreach($s in $ss) {$s.nameWrite-host "........................."$is = $s.ServiceInstancesforeach($i in $is) {if ($i.TypeName -eq "Microsoft SharePoint Foundation Administration") {$i.Typename$i.status}if ($i.TypeName -eq "Microsoft SharePoint Foundation Timer") {$i.Typename$i.status}}}
- From above result find out which server has disabled timer job.
- Check SPTimerServiceInstance is in disabled state and it is affecting all administrative operations that depend on timer jobs to be completed (like depoying..the solution or starting the User Profile Sync Service).
if ((Get-PSSnapin "Microsoft.SharePoint.PowerShell" -ErrorAction SilentlyContinue) -eq $null){Add-PSSnapin "Microsoft.SharePoint.PowerShell"}$farm = Get - SPFarm$disabledTimers = $farm.TimerService.Instances | where {$_.Status -ne "Online"}if ($disabledTimers -ne $null) {foreach($timer in $disabledTimers) {Write -Host "Timer service instance on server " $timer.Server.Name "is not Online. Current status:"$timer.StatusWrite -Host "Attempting to set the status of the service instance to online"$timer.Status = [Microsoft.SharePoint.Administration.SPObjectStatus]::Online$timer.Update()}} else {Write -Host "All Timer Service Instances in the farm are online! No problems found"}
- Clear the Config Cache on the all servers in the farm. Please follow this wiki for clearing config cache.
- Finally, redeploy the Solution either using PowerShell or Via Central admin.
Friday, January 12, 2018
SharePoint 2013 Cannot complete this action. Please try again
"Cannot complete this action. Please try again", one of the scary error in SharePoint.
I was doing the CU update on SharePoint with SharePoint 2013 on Premise, after successful CU update, all sites home page getting this weird "Cannot complete this action" error screen.

CU update itself took around 8-9 hours for all 11 servers. Lots of lots of debugging and reading the ULS logs didn't help me with only one option left to rollback to previous version by restoring the Database and Servers.
Here are some of the issues we faced:
The app pool account used for web application was not the DB_owner on the Content Databases after CU update. where as prior to update the same Content DB the app pool account was DB_Owner. After reading Microsoft document I found below article which was talks about "SP_DATA_Access" role.
ref: https://docs.microsoft.com/en-us/SharePoint/install/account-permissions-and-security-settings-in-sharepoint-2013#sp_data_access-database-role
Make sure you try the following:
I was doing the CU update on SharePoint with SharePoint 2013 on Premise, after successful CU update, all sites home page getting this weird "Cannot complete this action" error screen.

CU update itself took around 8-9 hours for all 11 servers. Lots of lots of debugging and reading the ULS logs didn't help me with only one option left to rollback to previous version by restoring the Database and Servers.
Here are some of the issues we faced:
- Home page was showing above error.
- ULS log was having error some times "cobalt.exception" error.
- When we tried to access some of the Page Layouts files we got "The URL is invalid. It may refer to a nonexistent file or folder or refer to a valid file that is not in the current Web" error.
- When we tried to create any new page or list we got "There are characters in the page URL name that are not valid. Type a different name" error.
The app pool account used for web application was not the DB_owner on the Content Databases after CU update. where as prior to update the same Content DB the app pool account was DB_Owner. After reading Microsoft document I found below article which was talks about "SP_DATA_Access" role.
ref: https://docs.microsoft.com/en-us/SharePoint/install/account-permissions-and-security-settings-in-sharepoint-2013#sp_data_access-database-role
Make sure you try the following:
- Verify "SP_Data_Access" has right kind of permission as mentioned in above link
In SharePoint 2013....
The Add-SPShellAdmin cmdlet does not grant the user membership to the db_owner role, but instead places the user in a SPDataAccess role
The SP_DATA_ACCESS role replaces the db_owner role in SharePoint 2013 - if above doesn't work then give DB_Owner role for app pool account on individual database.
- if step 2 works then "SP_Data_Access" role doesn't have proper permission.
- if step 2 fails then give app pool account sysadmin role. (This will resolve the above error definitely).
Updated on 09/20/2018:
Hi Guys, we found out the actual reason for above error in error log. i am sorry its very late to update this.
We are using Metalogix RBS. There was access denied on one of the Metalogix Stored Procedure. unfortunately it wasn't logged as "Unexpected" or "Error" that the reason we could not found this in Log since we were searching for Error.
Root Cause:
Moral of the Story:
Hi Guys, we found out the actual reason for above error in error log. i am sorry its very late to update this.
We are using Metalogix RBS. There was access denied on one of the Metalogix Stored Procedure. unfortunately it wasn't logged as "Unexpected" or "Error" that the reason we could not found this in Log since we were searching for Error.
Root Cause:
- Whenever we enabled Metalogix Job for Externalization on any Database Metalogix was adding some extra rbs roles and DB_Owner Permission.
- After our CU Installation, DB_Owner permission was removed by Microsoft since SPDATAAccess was already present on all databases.
- Unfortunately, our App Pool was not able to access the Metalogix functions and stored Procedure hence we received the error.
- after adding the DB_Owner permission to the database where RBS is enabled by Metalogix after that the error is gone.
Moral of the Story:
- If you get this king of error make sure app pool has proper permission on DBs or SharePoint Objects.
Hope this helps!
Friday, November 24, 2017
Using C#.Net DocuSign REST API to generate Recipient Signing URL
In my previous example i elaborated how to retrieve AccountID for all Login in DocuSign. Taking to the next level i had another requirement, In my Web App client wanted me to show the clickable link for my Envelopes which will take them to documents to Sign.
I thought this might be a straight forward solution to generate the Link. Unfortunately you can not create static formatted link. There is no property which can be used for this purpose.
By default, DocuSign transactions and workflows are initiated through email. The recipients - known as a remote recipients in this case - use system-generated email links to complete their documents through the simple and intuitive DocuSign Website. So when we required our web app/console app to generate these links using embedded recipients. You can let users sign or send documents directly through our UI, avoiding the context-switch to email.
To generate the recipient signing URL call the EnvelopeViews: createRecipient method, using the same identifying recipient information - including the clientUserId - that was sent with envelope
I thought this might be a straight forward solution to generate the Link. Unfortunately you can not create static formatted link. There is no property which can be used for this purpose.
By default, DocuSign transactions and workflows are initiated through email. The recipients - known as a remote recipients in this case - use system-generated email links to complete their documents through the simple and intuitive DocuSign Website. So when we required our web app/console app to generate these links using embedded recipients. You can let users sign or send documents directly through our UI, avoiding the context-switch to email.
To generate the recipient signing URL call the EnvelopeViews: createRecipient method, using the same identifying recipient information - including the clientUserId - that was sent with envelope
// we set the api client in global config
when we configured the client
ApiClient client = new ApiClient(basePath: "https://demo.docusign.net/restapi");
Configuration cfg = new Configuration(client);
//ApiClient apiClient = Configuration.Default.ApiClient;
string authHeader = "{\"Username\":\"" + usr + "\",
\"Password\":\"" + pwd + "\", \"IntegratorKey\":\"" + integratorKey + "\"}";
//Configuration.Default.AddDefaultHeader("X-DocuSign-Authentication",
authHeader);
cfg.AddDefaultHeader("X-DocuSign-Authentication", authHeader);
RecipientViewRequest viewOptions = new RecipientViewRequest()
{
ReturnUrl = "https://www.docusign.com/",
ClientUserId =
clientUserId, //"1001", // must match clientUserId of the embedded
recipient
AuthenticationMethod = "email",
UserName = userId , //"{USER_NAME}",
Email =
email//"{USER_EMAIL}"
};
// instantiate an envelopesApi object
EnvelopesApi envelopesApi = new
EnvelopesApi();
envelopesApi.Configuration = cfg;
// create the recipient view (aka signing URL)
ViewUrl recipientView = envelopesApi.CreateRecipientView(accountId, envelopeId, viewOptions);
// print the JSON response
//Console.WriteLine("ViewUrl:\n{0}",
JsonConvert.SerializeObject(recipientView));
//Trace.WriteLine("ViewUrl:\n{0}", JsonConvert.SerializeObject(recipientView));
// Start the embedded signing session
return recipientView.Url;
Subscribe to:
Posts (Atom)