Friday, April 22, 2022

Azure Series - Virtual Machines - Understanding Update Domains and Fault Domains with Visual Examples

In the context of Microsoft Azure, managing the availability and reliability of virtual machines is crucial for a successful cloud deployment. Azure employs the concepts of Update Domains and Fault Domains to ensure high availability and minimize the impact of planned or unplanned hardware maintenance. In this article, we will explore what Update Domains and Fault Domains are and illustrate their significance using visual examples.

Update Domains:

Update Domains are logical groupings of virtual machines within an availability set. Azure uses Update Domains to ensure that during planned maintenance events, not all virtual machines are taken down simultaneously. By dividing VMs into separate Update Domains, the system ensures that only one Update Domain is impacted at a time, while the other VMs remain operational.

Visual Representation of Update Domains:

Consider an availability set with four virtual machines (VM1, VM2, VM3, VM4), and it has three Update Domains (UD1, UD2, UD3).

In the figure below, each square represents an Update Domain, and the virtual machines are distributed across these Update Domains:


During a planned maintenance event, Azure may update VMs one Update Domain at a time. For example, Update Domain 1 (UD1) is updated first, and once it is completed, the system moves on to Update Domain 2 (UD2) and then to Update Domain 3 (UD3). This sequential approach ensures that a minimum number of VMs are affected at any given time, maintaining the availability of the application.

Fault Domains:

Fault Domains are logical groupings of virtual machines that share a common physical infrastructure. Azure uses Fault Domains to ensure that VMs are distributed across separate physical servers to protect against single points of failure. In the event of a hardware failure or outage in one Fault Domain, the VMs in other Fault Domains remain unaffected.

Visual Representation of Fault Domains:

Consider an availability set with four virtual machines (VM1, VM2, VM3, VM4), and it has three Fault Domains (FD1, FD2, FD3).

In the figure below, each rectangle represents a Fault Domain, and the virtual machines are distributed across these Fault Domains:

By distributing VMs across different Fault Domains, Azure ensures that if a hardware failure occurs in one Fault Domain, the VMs in other Fault Domains remain operational. This enhances the fault tolerance of the application and improves overall availability.

Note: 

  • Each virtual machine in your availability set is assigned an update domain and a fault domain by the underlying Azure platform. Each availability set can be configured with up to 3 fault domains and 20 update domains.
  • Availability zones are similar in concept to availability sets. However, there is a distinct difference. While availability sets are used to protect applications from hardware failures within an Azure data center, availability zones, protect applications from complete Azure data center failures.

Conclusion:

Update Domains and Fault Domains are essential concepts in Azure for ensuring high availability and resilience of virtual machines. Update Domains help manage planned maintenance events by updating VMs one domain at a time, while Fault Domains protect against hardware failures by distributing VMs across separate physical servers. By understanding and leveraging these concepts, Azure users can design and deploy robust cloud solutions that deliver consistent performance and availability for their applications.

Wednesday, April 13, 2022

Azure Series - Virtual Machine - Availability and Scale Set with example

Introduction:

Azure Virtual Machines (VMs) provide a scalable and flexible way to deploy and manage applications in the cloud. One of the key features that enhance the reliability and resilience of VMs is the concept of Availability Zones. In this article, we will explore what Availability Zones are in Azure, how they work, and provide examples to illustrate their significance in ensuring high availability for your applications.

What are Availability Zones in Azure?

Availability Zones are physically separate data centers within an Azure region. Each zone is equipped with its power, networking, and cooling infrastructure, ensuring that if one zone experiences an outage, the other zones continue to operate independently. Azure regions typically consist of multiple zones, and these zones are designed to provide redundancy and fault tolerance for your VMs and applications.

Note: To use availability zones, create your virtual machines in a supported Azure region.

Example 1: Single Virtual Machine in One Availability Zone

Let's consider a scenario where you have deployed a single virtual machine in an Azure region that supports Availability Zones. By default, the VM will be provisioned in Zone 1 of that region. This means that your VM is isolated from potential failures in other zones. If Zone 1 experiences any issues, such as hardware failure or network problems, the VM automatically fails over to another zone (e.g., Zone 2) within the same region, ensuring minimal downtime and maintaining the high availability of your application.


Example 2: Virtual Machine Scale Sets Across Availability Zones

In a more complex scenario, suppose you have a web application that requires multiple VM instances to handle incoming traffic. You can use Azure Virtual Machine Scale Sets (VMSS) to deploy and manage a group of identical VMs across different Availability Zones.

For instance, you can configure VMSS to distribute VM instances across three Availability Zones. If Zone 1 becomes unavailable due to maintenance or unforeseen issues, the traffic is automatically redirected to the VM instances in Zones 2 and 3, ensuring that your application remains accessible and resilient.

Example 3: Load Balancing with Availability Zones

Load balancers in Azure can also be configured to distribute incoming traffic across VMs in different Availability Zones. By creating an Azure Load Balancer and associating it with VMs spread across multiple zones, you ensure that if one zone is experiencing high traffic or experiencing an issue, the load balancer automatically directs traffic to the healthy VMs in other zones, thus maintaining consistent performance and availability.

Conclusion:

Availability Zones in Azure Virtual Machines play a vital role in ensuring high availability, fault tolerance, and resilience for your applications. By deploying VMs across multiple physically isolated zones, you minimize the risk of downtime and data loss due to zone-specific failures. Whether you have a single VM or a highly scalable application, leveraging Availability Zones in Azure enables you to provide a robust and reliable cloud infrastructure for your applications, enhancing the overall user experience and peace of mind for you as a developer.


Thursday, March 10, 2022

Azure Series - Virtual Machines - Desired State Configuration - Create and Use

 This article provides a step-by-step guide for doing the most common tasks with Azure Automation State Configuration, such as creating, importing, and compiling configurations, enabling machines to manage, and viewing reports.

Prerequisites

  1. An Azure Automation account
  2. An Azure Resource Manager VM (not Classic) running a supported operating system.

Step 1 : Create DSC Configuration

  1. Start VSCode.
  2. Type following text:
configuration MyTestConfig
{
    Node IsWebServer
    {
        WindowsFeature IIS
        {
            Ensure               = 'Present'
            Name                 = 'Web-Server'
            IncludeAllSubFeature = $true
        }
    }

    Node NotWebServer
    {
        WindowsFeature IIS
        {
            Ensure               = 'Absent'
            Name                 = 'Web-Server'
        }
    }
}
  1. Save the file as MyTestConfig.ps1.

Step 2: Import configuration into Azure Automation.

  1. Browse to Azure Portal, Automation Account Page.
  2. select State configuration (DSC) under Configuration Management
  3. On the State configuration (DSC) page, click the Configurations tab, then click Add
  4. Specify the configuration file created in step 1 and give appropriate name.

Step 3: Compile a configuration in Azure Automation

  1. Browse to Azure Portal, Automation Account Page.
  2. select State configuration (DSC) under Configuration Management
  3. On the State configuration (DSC) page, click the Configurations tab, then click Configuration created in step 2.
  4. Then click compile button to start compiling.

Step 4: Enable an ARM VM for management with State Configuration

  1. Browse to Azure Portal, Automation Account Page.
  2. select State configuration (DSC) under Configuration Management
  3. On the State configuration (DSC) page, select the Nodes tab, then click Add.
  4. On the Virtual Machines pane, select your VM.
  5. On the Virtual machine detail pane, click + Connect.
  6. On the Registration page, select the name of the node configuration to apply to the VM in the Node configuration name field.
    Note: Drop down will display all nodes from the file created in step 1.
  7. Check Reboot Node if Needed, then click OK.

The node configuration you specified is applied to the VM at intervals specified by the value provided for Configuration Mode Frequency. The VM checks for updates to the node configuration at intervals specified by the Refresh Frequency value.

Step 5: View manage nodes reports

  1. Browse to Azure Portal, Automation Account Page.
  2. select State configuration (DSC) under Configuration Management
  3. On the State configuration (DSC) page, select the Nodes tab.
  4. click the node record to open the reporting.

Wednesday, March 09, 2022

Azure Series - Desired State Configuration Introduction

 As Azure developers, one of the critical challenges we face is maintaining consistency and ensuring that our cloud infrastructure and resources are configured correctly across various environments. Azure Desired State Configuration (DSC) is a powerful platform feature that addresses this challenge by allowing us to define and enforce the desired state of Azure resources. In this article, we will explore the concept of Azure DSC, its benefits, and how developers can leverage it to manage infrastructure efficiently.

Understanding Azure Desired State Configuration (DSC):

Azure Desired State Configuration is a declarative platform feature in Azure that enables developers to define the desired configuration of Azure resources using PowerShell, PowerShell DSC, or ARM (Azure Resource Manager) templates. Rather than manually configuring resources, DSC allows us to declare what the end state should look like, and Azure handles the process of ensuring that the current state aligns with the desired state.

Key Benefits of Azure DSC for Developers:

  1. Consistency: DSC helps maintain consistent configurations across different environments, such as development, testing, and production, reducing the chances of configuration drift and potential issues.

  2. Automation: With DSC, developers can automate the configuration process, eliminating the need for manual setup and reducing human errors.

  3. Scalability: DSC is scalable, making it ideal for managing configurations of large-scale applications and resource deployments.

  4. Reusability: DSC configurations can be saved as templates, allowing developers to reuse them across multiple projects and resources.

  5. Version Control: DSC configurations can be stored in version control systems, ensuring a history of changes and facilitating collaboration within development teams.

How Azure Developers Can Leverage Azure DSC:

  1. Writing DSC Configurations:
    Developers can create DSC configurations using PowerShell DSC scripts or ARM templates. These configurations define the desired state of Azure resources, such as VM settings, networking, and security configurations.

  2. Applying DSC Configurations:
    Once the DSC configurations are defined, developers can apply them to target resources. This can be done through Azure Automation or by integrating DSC with Azure Resource Manager templates during resource deployment.

  3. Monitoring and Compliance:
    Azure DSC provides monitoring capabilities to track the status of resources and ensure they adhere to the desired state. Developers can verify compliance and make adjustments as needed to keep resources in the desired configuration.

  4. Integration with CI/CD Pipelines:
    Developers can incorporate DSC configurations into their CI/CD (Continuous Integration/Continuous Deployment) pipelines to automate the deployment and management of Azure resources.

Azure Desired State Configuration is a valuable tool for Azure developers to maintain consistency, automate infrastructure management, and ensure compliance across Azure resources. By embracing DSC, developers can focus on delivering applications and features while relying on Azure to handle the complexities of maintaining the desired state. With its scalability, reusability, and automation capabilities, Azure DSC becomes an essential part of the development process, making it easier to manage complex cloud environments and achieve seamless deployments.

Next Step: How to create and use DSC configuration

Wednesday, February 16, 2022

Azure Series - Azure App Service and .Net core Web API - Create and deploy to Azure Cloud

Introduction:

Azure App Service is a fully managed platform that enables developers to build, host, and scale web applications effortlessly. In this article, we will walk you through the process of creating an Azure App Service and deploying a .NET Core Web API to it. Additionally, we'll provide a sample request to demonstrate how to use the deployed API.

Prerequisites:

  1. An Azure account: Sign up for a free Azure account if you don't have one.
  2. Visual Studio or Visual Studio Code with .NET Core SDK installed.

Step 1: Create an Azure App Plan

  1. Sign in to the Azure portal (https://portal.azure.com ).
  2. Click on "Create a resource" and search for "App Service Plan"
  3. Fill in the required details, such as the resource group, app service plan name, Region, Pricing Plan (Basic).
  4. Click "Review + Create" and then "Create" to create the Azure App Plan .
Step 2: Create an Web App
  1. Select "Web App" from the list and click "Create."
  2. Fill in the required details, such as the resource group, app name, and runtime stack (.NET Core).
  3. Configure the desired settings, including the region, operating system (Linux), and plan size (pricing tier).

  4. Click "Review + Create" and then "Create" to create the Azure Web App.

Step 3: Create a .NET Core Web API Project

  1. Launch Visual Studio or Visual Studio Code and create a new project.
  2. Select the "ASP.NET  Core Web Application" template and choose "API" as the project type.

  3. Configure the project settings and create the project.

Step 4: Implement the .NET Core Web API

  1. In the newly created .NET Core Web API project, open the WeatherForecastController.cs file, which is an example controller that comes with the template.
  2. Define your API endpoints and logic to handle incoming requests. You can create additional controllers and models as needed for your application.

Step 5: Deploy the .NET Core Web API to Azure App Service

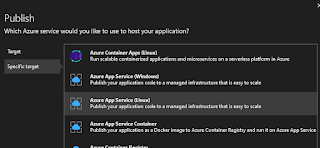
  1. Right-click on the project and select "Publish."
  2. Choose "Azure" as the target and select the Azure App Service (Linus)

  3. Follow the publishing wizard, ensuring you select the appropriate settings and configurations. Select the appropriate subscription and web app. 

  4. Skip last step "API Management", if you don't want to configure API Management.
  5. Click "Publish" to deploy your .NET Core Web API to Azure App Service.

Step 6: Test the Deployed API with a Sample Request

  1. Once the deployment is complete, navigate to your Azure App Service in the Azure portal.
  2. Under the "Settings" section, find the "URL" of your deployed API.
  3. Open a tool like Postman or use a browser to make a sample request to your API. For example:
    GET https://your-app-service-url/api/weatherforecast
    
    This will fetch weather forecast data from your deployed API.

Conclusion:

By following this step-by-step guide, you have successfully created an Azure App Service, deployed a .NET Core Web API, and tested it with a sample request. Azure App Service simplifies the process of hosting and managing web applications, allowing you to focus on building robust and scalable APIs without worrying about infrastructure management. Now you can continue to expand your API and leverage the power of Azure services to enhance your application further. Happy coding!