Introduction:
Azure App Service is a fully managed platform that enables developers to build, host, and scale web applications effortlessly. In this article, we will walk you through the process of creating an Azure App Service and deploying a .NET Core Web API to it. Additionally, we'll provide a sample request to demonstrate how to use the deployed API.
Prerequisites:
- An Azure account: Sign up for a free Azure account if you don't have one.
- Visual Studio or Visual Studio Code with .NET Core SDK installed.
Step 1: Create an Azure App Plan
- Sign in to the Azure portal (https://portal.azure.com ).
- Click on "Create a resource" and search for "App Service Plan"
- Fill in the required details, such as the resource group, app service plan name, Region, Pricing Plan (Basic).
- Click "Review + Create" and then "Create" to create the Azure App Plan .
- Select "Web App" from the list and click "Create."
- Fill in the required details, such as the resource group, app name, and runtime stack (.NET Core).
- Configure the desired settings, including the region, operating system (Linux), and plan size (pricing tier).

- Click "Review + Create" and then "Create" to create the Azure Web App.

Step 3: Create a .NET Core Web API Project
- Launch Visual Studio or Visual Studio Code and create a new project.
- Select the "ASP.NET Core Web Application" template and choose "API" as the project type.

- Configure the project settings and create the project.

Step 4: Implement the .NET Core Web API
- In the newly created .NET Core Web API project, open the
WeatherForecastController.csfile, which is an example controller that comes with the template. - Define your API endpoints and logic to handle incoming requests. You can create additional controllers and models as needed for your application.
Step 5: Deploy the .NET Core Web API to Azure App Service
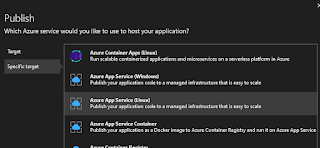
- Right-click on the project and select "Publish."
- Choose "Azure" as the target and select the Azure App Service (Linus)

- Follow the publishing wizard, ensuring you select the appropriate settings and configurations. Select the appropriate subscription and web app.

- Skip last step "API Management", if you don't want to configure API Management.
- Click "Publish" to deploy your .NET Core Web API to Azure App Service.


Step 6: Test the Deployed API with a Sample Request
- Once the deployment is complete, navigate to your Azure App Service in the Azure portal.
- Under the "Settings" section, find the "URL" of your deployed API.
- Open a tool like Postman or use a browser to make a sample request to your API. For example:
This will fetch weather forecast data from your deployed API.GET https://your-app-service-url/api/weatherforecast
Conclusion:
By following this step-by-step guide, you have successfully created an Azure App Service, deployed a .NET Core Web API, and tested it with a sample request. Azure App Service simplifies the process of hosting and managing web applications, allowing you to focus on building robust and scalable APIs without worrying about infrastructure management. Now you can continue to expand your API and leverage the power of Azure services to enhance your application further. Happy coding!