Tuesday, September 18, 2012

Configure audit settings for a individual List/Library


So far we have seen in my previous articles how to “Configure Audit Setting for Site Collection” and “Viewing Audit log report”. 

SharePoint audit policy can be enabled at site collection level setting but this may lead in many problems potentially generate a large number of audit events, particularly when the setting for viewing items or item properties is enabled and leading to either not being able to get the events you need for important lists or libraries or else enabling too much auditing and getting way to many events.

Thankfully in SharePoint 2010, Microsoft has provided the auditing on specific document libraries or lists.

At the list and library level we have a variety of activities that can audit including:

  • Viewing
  • Editing
  • Deletion
  • Check in /Check out

List/library level audit policy is extremely important when it comes to auditing who is viewing confidential information. If you enable View auditing at the site collection level you end up generating events for every page click by every user throughout the entire site collection which will create a load on resources.

Configure audit settings for a individual List/Library

  1. On the site collection home page, select List or Library from Quick Launch or Site actions > View All Site Content.
  2. On selection of List/Library click on List/Library setting icon on ribbon.
  3. Select “Information management policy settings” link under Permissions and Management.
    image1
  4. if your list has content type then it will display folder and content type (s) to select on which we can apply the audit policy.

    image3

    image2
  5. For instance a normal document library will have 2 content types: Document and Folder. Click on a content type and configure auditing. In the example below I’ve enabled auditing of any type of view and download access since this is a library contains confidential information.
    image4
  6. once you select Ok, SharePoint will begin auditing those actions on that particular list or library.
  7. you can use “Audit Log Report” to see individual List/Library audit report.

You can also see,

Thursday, September 13, 2012

Viewing audit log report


As we have seen in my previous article how to “Configure Audit Setting for Site Collection”. when we enable auditing, whenever there is any action on any list/library present in the site collection according to the Audit setting for site collection events will be logged in audit data. There many out of box options available to view this audit data. we will see in this article how to use them.

  1. On the site collection home page, click Site actions, point to Site settings, and then click Modify All Site Settings.
  2. On the Site Settings page, in the Site Collection Administration section, click Audit Log Report.

    Image1
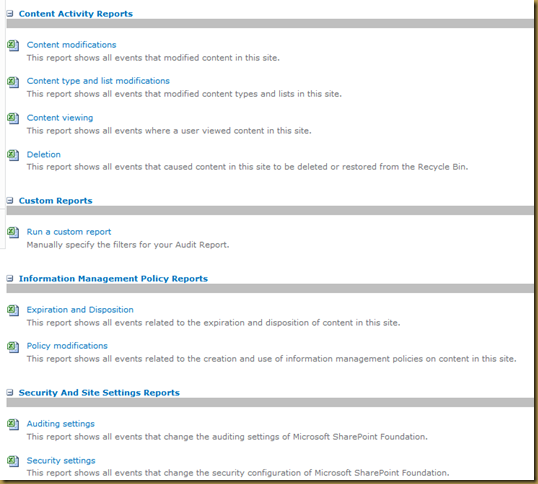
  3. One can use these following excel out of box reports to view Audit Log data collected for this Site Collection.

    Image2
  4. Each Excel type report can be customized to save in specific library by clicking on the each link.
    e.g. if you select “Content Viewing”

    Image3
  5. Type or Browse to the library where you want to save the report and click OK
  6. On the Operation Completed Successfully page, click click here to view this report.

To Manually specify the filters for your Audit Report

  1. Follow 1 to 3 step as above
  2. Select  “Run a custom report” under “Custom Reports”.
  3. Select the proper filter

    Image4
    1. File Location: Select document library where the report will be saved
    2. Location:  Select “All Lists” or single “List” to filter the audit data for report.
    3. Date Range: Specify the date range to filter the audit data.
    4. User: Specify the selected users only to filter the audit data.
    5. Events: Specify the selected events only to filter the audit data.
  4. On the Operation Completed Successfully page, click click here to view this report

You can also see,

Sunday, September 09, 2012

Configure audit settings for a site collection


Auditing enable us to capture action taken on various object in SharePoint such as Adding, editing, deleting, check in and check out etc. Administrator can review these audit information to produce various reports for business requirement and records management.

Site administrator can track various documents in libraries throughout the site collection. Administrator can generate a customized audit report about an individual record, item, column, content type, search or permissions. Predefined reports in excel can be used to review the audit log.

The audit log can captures the following information for the events that are selected to be audited.

  • Item name and location
  • Site from which an event originated
  • Item type (for example, list or document)
  • User ID associated with the event
  • Event date and time
  • Action taken on the item

There is no way by which you can modify the added entries where as Administrator can delete unwanted entries using SOM.

Configure audit settings for a site collection

  1. On the site collection home page, click Site actions, point to Site settings, and then click Modify All Site Settings.
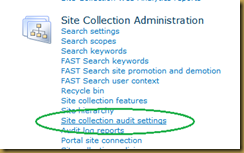
  2. On the Site Settings page, in the Site Collection Administration section, click Site collection audit settings.

    Image1
  3. On Audit Setting page, select appropriate option for your site collection

    Image2
    1. Audit Log Trimming:
      1. Select “Yes” if you want to control the size of audit log. The schedule for audit log trimming is configured by your server administrator.
      2. You can also specify the number of days of audit log data to retain, this means if you specify the 3 days then only last three days log will be kept in audit log.
      3. This also provides the facility to copy your audit log data in specified particular document library before trimming started by job.
    2. Documents and Items: Here you can specify the events that we need to capture for Documents or List/Library Items.

      Following are the events that you can on/off on List/Library Items.

      • Opening or downloading documents, viewing items in lists, or viewing item properties
      • Editing items
      • Checking out or checking in items
      • Moving or copying items to another location in the site
      • Deleting or restoring items

    3. Lists, Libraries, and Sites: Here you can specify the events that we need to capture whenever there is change on List, Library, Sites or Content Types.

      Following are the events that you can on/off on Lists, Libraries, and Sites

      • Editing content types and columns
      • Searching site content
      • Editing users and permissions

  4. When you select an event to be audited, It will be audited for every item in the site collection each time the event occurs.

Note: This can potentially generate a large number of audit events, particularly when the setting for viewing items or item properties is enabled.

You can also see,

Tuesday, August 21, 2012

SharePoint 2010 Custom Sign In Page


In Previous article we have seen how to configure the Form based authentication (FBA) for Claims Authentication.

Step 1: Create a new page CustomLoginPage.aspx under _Layouts Mapped Folder

As we have seen in our previous article, SharePoint provides two basic forms for Claims authentication by default.

  1. Stored at “C:\Program Files\Common Files\Microsoft Shared\Web Server Extensions\14\TEMPLATE\IDENTITYMODEL\LOGIN\Default.aspx” : This displays the log on selector and provide options as windows or FBA in drop down list.
  2. Stored at “C:\Program Files\Common Files\Microsoft Shared\Web Server Extensions\14\TEMPLATE\IDENTITYMODEL\FORMS\Default.aspx” : This is followed by the above form if user selects FBA as login option.

Create new CustomLoginPage.aspx and replace following html code. This code is taken 2nd file mentioned above to create our new custom login form. Here I tried to merge above two forms in one form by adding extra link below password to login using Windows Authentication.
Because of the below functionality if user is FBA user then he/she can directly enter the credentials and try to sing in. if he/she wishes to sign in using windows authentication then he/she can make use of “Windows Authentication” Link

<%@ Assembly Name="$SharePoint.Project.AssemblyFullName$" %>

<%@ Assembly Name="Microsoft.SharePoint.IdentityModel, Version=14.0.0.0, Culture=neutral, PublicKeyToken=71e9bce111e9429c" %>

<%@ Assembly Name="Microsoft.SharePoint, Version=14.0.0.0, Culture=neutral, PublicKeyToken=71e9bce111e9429c"%>

<%@ Page Language="C#" Inherits="MyApplication.Layouts.CustomLoginPage"

        CodeBehind="CustomLoginPage.aspx.cs"

        MasterPageFile="~/_layouts/simple.master"       %>

<%@ Import Namespace="Microsoft.SharePoint.WebControls" %>

<%@ Register Tagprefix="SharePoint" Namespace="Microsoft.SharePoint.WebControls" Assembly="Microsoft.SharePoint, Version=14.0.0.0, Culture=neutral, PublicKeyToken=71e9bce111e9429c" %>

<%@ Register Tagprefix="Utilities" Namespace="Microsoft.SharePoint.Utilities" Assembly="Microsoft.SharePoint, Version=14.0.0.0, Culture=neutral, PublicKeyToken=71e9bce111e9429c" %>

<%@ Import Namespace="Microsoft.SharePoint" %>

<%@ Assembly Name="Microsoft.Web.CommandUI, Version=14.0.0.0, Culture=neutral, PublicKeyToken=71e9bce111e9429c" %>


<asp:Content ContentPlaceHolderId="PlaceHolderPageTitle" runat="server">

       <SharePoint:EncodedLiteral runat="server"  EncodeMethod="HtmlEncode" Id="ClaimsFormsPageTitle" text="<%$Resources:wss, login_pagetitle%>"/>

</asp:Content>

<asp:Content ContentPlaceHolderId="PlaceHolderPageTitleInTitleArea" runat="server">

       <SharePoint:EncodedLiteral runat="server"  EncodeMethod="HtmlEncode" Id="ClaimsFormsPageTitleInTitleArea" text="<%$Resources:wss, login_pagetitle%>"/>

</asp:Content>

<asp:Content ContentPlaceHolderId="PlaceHolderSiteName" runat="server"/>

<asp:Content ContentPlaceHolderId="PlaceHolderMain" runat="server">


<div id="divSignInControl" style="display:block" runat="server">

 <div id="SslWarning" style="color:red;display:none">

 <SharePoint:EncodedLiteral runat="server"  EncodeMethod="HtmlEncode" Id="ClaimsFormsPageMessage" text="<%$Resources:wss,SSL_warning%>" />

 </div>

  <script language="javascript" >

      if (document.location.protocol != 'https:') {

          var SslWarning = document.getElementById('SslWarning');

          SslWarning.style.display = '';

      }

  </script>


 <asp:login id="signInControl" FailureText="<%$Resources:wss,login_pageFailureText%>" runat="server" width="100%" OnAuthenticate="signInControl_Authenticate">

       <layouttemplate>

        <asp:label id="FailureText" class="ms-error" runat="server"/>

              <table width="100%">

              <tr>

                     <td nowrap="nowrap"><SharePoint:EncodedLiteral ID="EncodedLiteral1" runat="server" text="<%$Resources:wss,login_pageUserName%>" EncodeMethod='HtmlEncode'/></td>

                     <td width="100%"><asp:textbox id="UserName" autocomplete="off" runat="server" class="ms-inputuserfield" width="99%" /></td>

              </tr>

              <tr>

                     <td nowrap="nowrap"><SharePoint:EncodedLiteral ID="EncodedLiteral2" runat="server" text="<%$Resources:wss,login_pagePassword%>" EncodeMethod='HtmlEncode'/></td>

                     <td width="100%"><asp:textbox id="password" TextMode="Password" autocomplete="off" runat="server" class="ms-inputuserfield" width="99%"/></td>

              </tr>

              <tr>

                     <td colspan="2" align="right"><asp:button id="login" commandname="Login" text="<%$Resources:wss,login_pagetitle%>" runat="server" /></td>

              </tr>

              <tr>

<td colspan="2">

            <asp:label id="lblWindowsSignin" Text="Sign in automatically using" runat="server"/>

            <asp:LinkButton id="lnkWindowsAuth" Text="Windows Authentication" OnClick="lnkWindowsAuth_Click" runat="server"/>

            <%--<asp:checkbox id="RememberMe" text="<%$SPHtmlEncodedResources:wss,login_pageRememberMe%>" runat="server" />--%></td> 

              </tr>

              </table>

       </layouttemplate>

 </asp:login>

 </div>

</asp:Content>

CustomLoginPage

Step 2: Modify Code behind CustomLoginPage.aspx.cs for Authentication process

Derive the page class from “IdentityModelSignInPageBase”. This gives you freedom to develop the page freely in your custom format. Do not forget to include following namespaces

  1. Microsoft.SharePoint.IdentityModel.Pages
  2. Microsoft.SharePoint.IdentityModel
  3. System.IdentityModel.Tokens

to use above namespaces you need to add Microsoft.SharePoint.IdentityModel dll. in reference. This dll can be found at “C:\Windows\assembly\GAC_MSIL\Microsoft.SharePoint.IdentityModel\14.0.0.0__71e9bce111e9429c\Microsoft.SharePoint.IdentityModel.dll”.

using System;

using Microsoft.SharePoint;

using Microsoft.SharePoint.IdentityModel.Pages;

using System.Web.UI.WebControls;

using Microsoft.SharePoint.IdentityModel;

using Microsoft.SharePoint.Utilities;

using Microsoft.SharePoint.Administration;

using System.IdentityModel.Tokens;

using System.Web;


namespace MyApplication.Layouts

{

    public partial class CustomLoginPage :  IdentityModelSignInPageBase

    {

        protected void Page_Load(object sender, EventArgs e)

        {

        }


        /// <summary>

        /// Establish the token

        /// </summary>

        /// <param name="securityToken"></param>

        private void EstablishSessionWithToken(SecurityToken securityToken)

        {

            if (null == securityToken)

            {

                throw new ArgumentNullException("securityToken");

            }

            SPFederationAuthenticationModule fam = SPFederationAuthenticationModule.Current;

            if (null == fam)

            {

                throw new ArgumentException(null, "MyApplication Authentication Module");

            }


            fam.SetPrincipalAndWriteSessionToken(securityToken);

        }


        /// <summary>

        /// Called after user is successfully logged in

        /// </summary>

        /// <param name="sender"></param>

        /// <param name="e"></param>

        protected void signInControl_Authenticate(object sender, AuthenticateEventArgs e)

        {

            SecurityToken token = null;

            Login formsLoginControl = sender as Login;

            if (null != (token = GetSecurityToken(formsLoginControl.UserName, formsLoginControl.Password)))

            {

                EstablishSessionWithToken(token);

                e.Authenticated = true;

                base.RedirectToSuccessUrl();

            }

        }


        /// <summary>

        /// Get IIS Settings

        /// </summary>

        private SPIisSettings IisSettings

        {

            get

            {


                SPWebApplication webApp = SPWebApplication.Lookup(new Uri(SPContext.Current.Web.Url));

                SPIisSettings settings = webApp.IisSettings[SPUrlZone.Default];

                return settings;

            }

        }


        /// <summary>

        /// Get security Token

        /// </summary>

        /// <param name="formsLoginControl"></param>

        /// <returns></returns>

        private SecurityToken GetSecurityToken(string username, string password)

        {

            SecurityToken token = null;

            SPIisSettings iisSettings = IisSettings;

            Uri appliesTo = base.AppliesTo;


            if (string.IsNullOrEmpty(username) ||

                string.IsNullOrEmpty(password))

                return null;


            SPFormsAuthenticationProvider authProvider = iisSettings.FormsClaimsAuthenticationProvider;

            token = SPSecurityContext.SecurityTokenForFormsAuthentication(

                appliesTo,

                authProvider.MembershipProvider,

                authProvider.RoleProvider,

                username,

                password);


            return token;

        }


        /// <summary>

        /// Log on with Windows Authentication

        /// </summary>

        /// <param name="sender"></param>

        /// <param name="e"></param>

        protected void lnkWindowsAuth_Click(object sender, EventArgs e)

        {

            string components = HttpContext.Current.Request.Url.GetComponents(

                                    UriComponents.Query, UriFormat.SafeUnescaped);

            SPUtility.Redirect("/_windows/default.aspx", SPRedirectFlags.Default, this.Context, components);

        }

    }


}

Step 3: Create a feature to change Sign in Page for Web Application

We made our Custom Login Page. Since SharePoint still shows default sing in page and we can change that manually from Central Admin as well as through the feature.

To Change Sing in Page manually:

  1. Browse to Central Admin > Managed Web Application
  2. Select Web Application.
  3. Select “Authentication Provider“ button from Ribbon.
    Claims-AuthenticationProvider
  4. Select “Default” Zone.
    Claims-AuthenticationProvider-DefaultZone
  5. Select “Custom Sign In Page” option in “Sign in Page” section.
    Claims-AuthenticationProvider-CustomSignInPage
  6. Add CustomLoginPage.aspx path to the textbox “/_layouts/MyApplication/CustomLoginPage.aspx”.
  7. Click on “OK” button to save.
  8. Close “Default” zone window.
  9. Visit the Web site to see changed effect.

To Change Sing in Page using Feature:

It is possible to change the Custom Sign in Page using feature activated/deactivated events.

  1. Create blank feature “CustomLoginPageSetting”
  2. Set Feature Scope as “WebApplication”
  3. “ApplyCustomSignInPage” & “RemoveCustomSigninPage” are methods which allows you to set/reset Login Custom Page.
  4. It is necessary to call Provision() method of Web Application to ensure the changes to get propagate to the configuration file & content database if necessary.
  5. Feature can be activated for particular Web Application in Central Admin.

using System;

using System.Runtime.InteropServices;

using System.Security.Permissions;

using Microsoft.SharePoint;

using Microsoft.SharePoint.Security;

using Microsoft.SharePoint.Administration;

using System.Reflection;


namespace MyApplication.Features.CustomLoginPageSetting

{

    /// <summary>

    /// This class handles events raised during feature activation, deactivation, installation, uninstallation, and upgrade.

    /// </summary>

    /// <remarks>

    /// The GUID attached to this class may be used during packaging and should not be modified.

    /// </remarks>


    [Guid("04b80854-ec00-4d09-ad7e-107179b9e3e1")]

    public class CustomLoginPageSettingEventReceiver : SPFeatureReceiver

    {

        const string CUSTOM_LOGIN_PAGE = "/_layouts/MyApplication/CustomLoginPage.aspx";


        #region "Public methods"

        public override void FeatureActivated(SPFeatureReceiverProperties properties)

        {

            SPSecurity.RunWithElevatedPrivileges(delegate()

            {

                try

                {

                    // Step1. Change the Default Sign in Page to Custom Sign In Page

                    SPWebApplication webApp = properties.Feature.Parent as SPWebApplication;

                    ApplyCustomSignInPage(webApp);

                }

                catch (Exception ex)

                {                   

                }

            });

        }


        /// <summary>

        /// Feature Deactivation

        /// </summary>

        /// <param name="properties"></param>

        public override void FeatureDeactivating(SPFeatureReceiverProperties properties)

        {

            SPSecurity.RunWithElevatedPrivileges(delegate()

            {

                try

                {

                    // Step1. Remove custom Sign in Page

                    SPWebApplication webApp = properties.Feature.Parent as SPWebApplication;

                    RemoveCustomSignInPage(webApp);

                }

                catch (Exception ex)

                {

                }

            });

        }

        #endregion "Public methods"


        #region "Private methods"

        /// <summary>

        /// Change the custom Sign In Page

        /// </summary>

        /// <param name="site"></param>

        private void ApplyCustomSignInPage(SPWebApplication webApp)

        {

            var iisSettings = webApp.GetIisSettingsWithFallback(SPUrlZone.Default);

            var signInUrlProperty = iisSettings.ClaimsAuthenticationRedirectionUrl;


            // this works, because the protocol is included in the string

            Uri serverUri = new Uri(webApp.Sites[0].Url); 

            // needs UriKind arg, or UriFormatException is thrown

            Uri relativeUri = new Uri(CUSTOM_LOGIN_PAGE, UriKind.Relative);  

            // Uri(Uri, Uri) is the preferred constructor in this case

            Uri fullUri = new Uri(serverUri, relativeUri);


            // update the custom Sign in page url to Custom Sign Page

            iisSettings.ClaimsAuthenticationRedirectionUrl = fullUri;

            webApp.Update(true);

            webApp.Provision();

        }


        /// <summary>

        /// Change the custom Sign In Page

        /// </summary>

        /// <param name="site"></param>

        private void RemoveCustomSignInPage(SPWebApplication webApp)

        {           

            var iisSettings = webApp.GetIisSettingsWithFallback(SPUrlZone.Default);

            var signInUrlProperty = iisSettings.ClaimsAuthenticationRedirectionUrl;           


            // Reset to Default to Sign in Page

            iisSettings.ClaimsAuthenticationRedirectionUrl = null;

            webApp.Update(true);

            webApp.Provision();

        }

        #endregion

    }

}