Wednesday, February 16, 2022

Azure Series - Azure App Service and .Net core Web API - Create and deploy to Azure Cloud

Introduction:

Azure App Service is a fully managed platform that enables developers to build, host, and scale web applications effortlessly. In this article, we will walk you through the process of creating an Azure App Service and deploying a .NET Core Web API to it. Additionally, we'll provide a sample request to demonstrate how to use the deployed API.

Prerequisites:

  1. An Azure account: Sign up for a free Azure account if you don't have one.
  2. Visual Studio or Visual Studio Code with .NET Core SDK installed.

Step 1: Create an Azure App Plan

  1. Sign in to the Azure portal (https://portal.azure.com ).
  2. Click on "Create a resource" and search for "App Service Plan"
  3. Fill in the required details, such as the resource group, app service plan name, Region, Pricing Plan (Basic).
  4. Click "Review + Create" and then "Create" to create the Azure App Plan .
Step 2: Create an Web App
  1. Select "Web App" from the list and click "Create."
  2. Fill in the required details, such as the resource group, app name, and runtime stack (.NET Core).
  3. Configure the desired settings, including the region, operating system (Linux), and plan size (pricing tier).

  4. Click "Review + Create" and then "Create" to create the Azure Web App.

Step 3: Create a .NET Core Web API Project

  1. Launch Visual Studio or Visual Studio Code and create a new project.
  2. Select the "ASP.NET  Core Web Application" template and choose "API" as the project type.

  3. Configure the project settings and create the project.

Step 4: Implement the .NET Core Web API

  1. In the newly created .NET Core Web API project, open the WeatherForecastController.cs file, which is an example controller that comes with the template.
  2. Define your API endpoints and logic to handle incoming requests. You can create additional controllers and models as needed for your application.

Step 5: Deploy the .NET Core Web API to Azure App Service

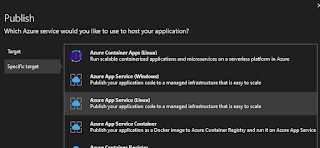
  1. Right-click on the project and select "Publish."
  2. Choose "Azure" as the target and select the Azure App Service (Linus)

  3. Follow the publishing wizard, ensuring you select the appropriate settings and configurations. Select the appropriate subscription and web app. 

  4. Skip last step "API Management", if you don't want to configure API Management.
  5. Click "Publish" to deploy your .NET Core Web API to Azure App Service.

Step 6: Test the Deployed API with a Sample Request

  1. Once the deployment is complete, navigate to your Azure App Service in the Azure portal.
  2. Under the "Settings" section, find the "URL" of your deployed API.
  3. Open a tool like Postman or use a browser to make a sample request to your API. For example:
    GET https://your-app-service-url/api/weatherforecast
    
    This will fetch weather forecast data from your deployed API.

Conclusion:

By following this step-by-step guide, you have successfully created an Azure App Service, deployed a .NET Core Web API, and tested it with a sample request. Azure App Service simplifies the process of hosting and managing web applications, allowing you to focus on building robust and scalable APIs without worrying about infrastructure management. Now you can continue to expand your API and leverage the power of Azure services to enhance your application further. Happy coding!

Sunday, June 27, 2021

Azure Series - Virtual Network - Demystifying Virtual IP Addresses and Subnet IP Addresses

 In the realm of networking, understanding the concepts of Virtual IP (VIP) addresses and Subnet IP (Subnet IP) addresses is essential. These addresses play crucial roles in modern network architectures, enabling efficient communication and resource management. In this article, we will delve into the details of how to read and interpret Virtual IP addresses and Subnet IP addresses, providing a comprehensive guide to these fundamental networking concepts.

What are Virtual IP Addresses?

A Virtual IP address (VIP) is an IP address that is not associated with a physical network interface but instead represents a service or application running on a group of servers or nodes. The primary purpose of a VIP is to provide a single, consistent address that clients can use to access a service, even if the service is distributed across multiple servers for load balancing or high availability.

Reading Virtual IP Addresses:

A Virtual IP address is typically denoted in the standard IPv4 format, consisting of four octets separated by periods, such as "192.168.1.10." To read a Virtual IP address, break down the address into its four octets and interpret each value:

Example: 192.168.1.10

  • Octet 1 (192): Represents the first 8 bits of the IP address.
  • Octet 2 (168): Represents the second 8 bits of the IP address.
  • Octet 3 (1): Represents the third 8 bits of the IP address.
  • Octet 4 (10): Represents the fourth 8 bits of the IP address.

What are Subnet IP Addresses?

A Subnet IP address is an IP address that belongs to a specific subnet within a larger network. Subnetting is a technique used to divide a large network into smaller, more manageable segments, known as subnets. Subnet IP addresses are essential for optimizing network performance, security, and resource allocation.

Reading Subnet IP Addresses:

Subnet IP addresses are also represented in the standard IPv4 format, with four octets separated by periods. To read a Subnet IP address, consider the concept of subnet masks, which determine the size of the subnet and how many IP addresses are available for hosts within that subnet.

Example: 192.168.1.0/24

  • The "/24" in the example is the subnet mask, represented in CIDR notation. It indicates that the first 24 bits (or three octets) of the IP address are used to define the network, and the remaining 8 bits (or one octet) are reserved for host addresses within the subnet.
  • In this example, the subnet range is from 192.168.1.0 to 192.168.1.255, with 192.168.1.0 reserved for the network address and 192.168.1.255 reserved for the broadcast address.

By grasping the fundamentals of VIPs and Subnet IPs, organizations can optimize their networking strategies, improve service availability, and enhance overall network performance.

Thursday, May 27, 2021

Azure Series - Steps to expose an on-premise .NET Core API through Azure API Management

Let's walk through an example of how to expose an on-premise .NET Core API through Azure API Management.

Scenario:
You have a .NET Core API running on-premise, and you want to make it securely accessible through Azure API Management. Azure API Management acts as a gateway, providing features like authentication, authorization, rate limiting, and caching for your API.

Step 1: Set Up On-Premise .NET Core API
Ensure that your .NET Core API is running and accessible on your on-premise server. Make sure it's properly secured and can handle incoming requests.

Step 2: Create an Azure API Management Service
Go to the Azure portal and create a new API Management service. Choose a name, subscription, resource group, location, and pricing tier that best suits your needs.

Step 3: Import API into Azure API Management
In the Azure API Management service, navigate to the "APIs" section and click on "Add a new API." Here, you'll have two options: "Blank API" or "API from OpenAPI file." Choose the appropriate method to import your API.

  1. Option 1: If you have an OpenAPI (Swagger) file for your on-premise API, you can directly import it by selecting the "API from OpenAPI file" option and providing the file's URL.

  2. Option 2: If you don't have an OpenAPI file, you can choose the "Blank API" option and manually define the endpoints, operations, and other details of your API.

Step 4: Configure Backend to Point to On-Premise .NET Core API
In the API Management service, navigate to your imported API and click on "Settings." Under the "Backend" section, configure the "Web service URL" to point to the endpoint of your on-premise .NET Core API.

Step 5: Secure the API with Policies (Optional)
If your on-premise API requires authentication or additional security measures, you can apply Azure API Management policies to enforce them. For example, you can add JWT validation or client certificate authentication policies.

Step 6: Publish the API
Once you have configured the API Management service with your on-premise API details, click on "Save" and then "Publish" to make it accessible.

Step 7: Test the API
Now that your on-premise .NET Core API is exposed through Azure API Management, you can test it using the provided developer portal or tools like Postman. Verify that your API is accessible and that any security measures you implemented are working as expected.

Conclusion:
By following these steps, you can securely expose your on-premise .NET Core API through Azure API Management. This allows you to leverage the powerful features of API Management while ensuring secure and controlled access to your on-premise API from external clients or applications.

Wednesday, May 12, 2021

Azure Series - Virtual Network - Communications between Azure Resources and On-Premise Resources

 As organizations increasingly adopt cloud computing, the need for seamless communication between on-premise resources and cloud-based assets becomes paramount. Azure Virtual Networks serve as the linchpin, connecting these disparate environments and enabling secure data transfer. In this article, we will explore how virtual network communication is achieved between Azure resources and on-premise resources, along with the crucial concepts of filtering and routing network traffic.

Understanding Virtual Network Communications

Azure Virtual Networks act as isolated network environments within the Azure cloud, allowing organizations to deploy resources securely. To enable communication between Azure and on-premise resources, 3 approaches are used:

1. Point-to-Site VPN: A Point-to-Site (P2S) VPN gateway connection lets you create a secure connection to your virtual network from an individual client computer. A P2S connection is established by starting it from the client's computer. This solution is useful for telecommuters who want to connect to Azure VNets from a remote location, such as from home or a conference. P2S VPN is also a useful solution to use instead of S2S VPN when you have only a few clients that need to connect to a VNet.

Below 2 options are commonly used.

2. Site-to-Site VPN: A Site-to-Site Virtual Private Network (VPN) establishes a secure and encrypted connection between an on-premise and Azure Virtual Network. This allows both environments to act as if they are on the same local network, enabling seamless communication between on-premise resources and resources in Azure. Site-to-site VPNs are particularly useful for organizations that need to extend their on-premise infrastructure to the cloud.

3. ExpressRoute: ExpressRoute provides a private, dedicated connection between an organization's on-premise network and Azure's network. Unlike Site-to-Site VPNs, ExpressRoute offers higher bandwidth, lower latency, and a more reliable connection. It is an excellent choice for enterprises with substantial data transfer requirements, mission-critical applications, and strict performance and security needs.

Filtering Network Traffic with Network Security Groups (NSGs)

Azure Virtual Networks employ Network Security Groups (NSGs) to control inbound and outbound network traffic. NSGs act as virtual firewalls, allowing organizations to define rules for network traffic flow based on source and destination IP addresses, ports, and protocols. The key features of NSGs include:

  1. Inbound Security Rules: Organizations can create inbound security rules to control the traffic coming into Azure resources. For example, a web server's inbound rule might allow HTTP (port 80) and HTTPS (port 443) traffic, while denying all other ports.

  2. Outbound Security Rules: Outbound rules regulate the traffic leaving Azure resources. Organizations can restrict certain outbound connections to ensure data security and compliance.

  3. Network Interface Level: NSGs can be applied at the subnet level or directly to individual network interfaces, providing granular control over network traffic.

Routing Network Traffic with User-Defined Routes

Azure Virtual Networks utilize User-Defined Routes (UDRs) to customize the path of network traffic within the virtual network. With UDRs, organizations can override Azure's default routing behavior and create specific routing tables. Key aspects of UDRs include:

  1. Custom Route Tables: UDRs allow administrators to create custom route tables and associate them with subnets. This enables organizations to direct traffic through specific network appliances or services, ensuring that it follows the desired path.

  2. Forced Tunneling: One common use case for UDRs is forced tunneling, where all traffic from the virtual network is directed back to an on-premise VPN or firewall device for additional security and monitoring.

Through Site-to-Site VPNs and ExpressRoute connections, organizations can establish secure links and seamlessly integrate their environments. By leveraging Network Security Groups, businesses can filter network traffic, enforce security policies, and protect sensitive data. Furthermore, User-Defined Routes provide the flexibility to control network traffic flow, offering enhanced control and efficiency.

Monday, May 03, 2021

Azure Series - Virtual Network - Exploring Key Scenarios with Virtual Networks and Creating an Azure Virtual Network with Subnets

Virtual networks (VNets) are essential components of cloud computing that enable secure and seamless communication between resources within the same cloud infrastructure. In this article, we will delve into the key scenarios where virtual networks play a vital role and provide a step-by-step guide on creating an Azure Virtual Network with subnets, using Microsoft Azure as our cloud platform of choice.

Key Scenarios with Virtual Networks

1. Isolated Environment: Virtual networks offer the ability to create isolated environments, commonly known as subnets, which allow organizations to compartmentalize their resources. This isolation ensures that sensitive data and critical applications remain secure and are shielded from unauthorized access.

2. Resource Segmentation: By deploying multiple subnets within a virtual network, an organization can effectively segregate different types of resources based on their function and security requirements. For example, a three-tier application can have separate subnets for web servers, application servers, and database servers, each with its own set of security rules.

3. Site-to-Site Connectivity: Virtual networks enable secure connectivity between on-premises networks and cloud-based resources. Organizations can extend their on-premises network to Azure by establishing a site-to-site VPN tunnel, enabling seamless and secure data transfer between the two environments.

4. Multi-Region Deployment: For businesses with a global presence, Azure Virtual Networks can span across multiple regions, facilitating a multi-region deployment strategy. This ensures high availability and disaster recovery, as resources can be replicated and distributed across different regions.

5. Network Security Groups: Azure Virtual Networks come equipped with Network Security Groups (NSGs) that allow the implementation of fine-grained security rules for inbound and outbound traffic. NSGs help in controlling network traffic flow and protecting resources from unauthorized access.

Creating an Azure Virtual Network with Subnets

Now, let's walk through the steps to create an Azure Virtual Network with subnets using the Azure portal:

  1. Sign in to the Azure portal and navigate to "Create a resource."

  2. Type "Virtual Network" in the search bar and select "Virtual Network" from the search results.

  3. Click "Create" to start the creation process.

  4. Provide the required details, such as the name of the virtual network, the region where it will be deployed, the IP address space, and the subnet details.

  5. Configure the subnets within the virtual network by specifying the subnet name and its IP address range.

  6. Add additional subnets as needed to fulfill your resource segregation requirements.

  7. Configure the network security groups for each subnet to control traffic flow and enhance security.

  8. Review all the settings, and once satisfied, click "Create" to create the Azure Virtual Network along with the specified subnets.

Saturday, May 01, 2021

Azure Series - Cosmos DB : Managing Indexing Policies in Azure Cosmos DB

 Azure Cosmos DB, a fully managed NoSQL database service, provides flexible indexing policies that allow developers to optimize query performance according to their specific application needs. In this article, we will explore various indexing options and their management in Azure Cosmos DB, including opt-in, opt-out, composite indexing, exclude all, and no indexing, accompanied by practical examples.

Understanding Indexing in Azure Cosmos DB

Indexes in Azure Cosmos DB are key components that facilitate efficient query execution by organizing and optimizing data retrieval. They enable faster access to data, especially when performing filtering, sorting, and aggregations. Cosmos DB offers two primary modes of indexing: automatic indexing and manual indexing.

  1. Automatic Indexing: This mode allows Cosmos DB to automatically index all properties within the containers. It simplifies the development process, as developers don't need to explicitly define indexes. However, it may lead to higher storage costs and slower write performance, as every property gets indexed.

  2. Manual Indexing: In this mode, developers have greater control over which properties get indexed. They can specify which properties should be indexed based on query patterns and data access requirements. Manual indexing reduces storage costs and provides better write performance compared to automatic indexing.

Managing Indexing Policies in Azure Cosmos DB

Let's explore different scenarios of managing indexing policies in Azure Cosmos DB with examples:

1. Opt-In Indexing:

Opt-In indexing allows developers to explicitly specify which properties to index, enhancing query performance for specific queries. Consider a container with documents representing books, and we want to index the "title" and "author" properties for efficient search:

// Define the indexing policy with opt-in indexing
IndexingPolicy indexingPolicy = new IndexingPolicy
{
    IncludedPaths =
    {
        new IncludedPath { Path = "/title/*" },   // Opt-in index for the title property
        new IncludedPath { Path = "/author/*" },  // Opt-in index for the author property
    },
    ExcludedPaths =
    {
        new ExcludedPath { Path = "/*" } // Exclude all other properties from indexing
    }
};

// Apply the indexing policy to the container
await container.ReplaceContainerAsync(new ContainerProperties(container.Id, partitionKeyPath)
{
    IndexingPolicy = indexingPolicy
});

2. Opt-Out Indexing:

Opt-Out indexing enables developers to exclude certain properties from indexing, reducing storage costs and write overhead. In this example, we exclude the "description" property from indexing:

// Define the indexing policy with opt-out indexing
IndexingPolicy indexingPolicy = new IndexingPolicy
{
    ExcludedPaths =
    {
        new ExcludedPath { Path = "/description/*" } // Opt-out index for the description property
    }
};

// Apply the indexing policy to the container
await container.ReplaceContainerAsync(new ContainerProperties(container.Id, partitionKeyPath)
{
    IndexingPolicy = indexingPolicy
});

3. Composite Indexing:

Composite indexing allows developers to create composite indexes for queries involving multiple properties. For instance, if we frequently query books based on both "title" and "category," we can create a composite index for those properties:

// Define the indexing policy with composite indexing
IndexingPolicy indexingPolicy = new IndexingPolicy
{
    CompositeIndexes =
    {
        new CompositePath { Path = "/title", Order = CompositePathSortOrder.Ascending },
        new CompositePath { Path = "/category", Order = CompositePathSortOrder.Ascending }
    }
};

// Apply the indexing policy to the container
await container.ReplaceContainerAsync(new ContainerProperties(container.Id, partitionKeyPath)
{
    IndexingPolicy = indexingPolicy
});

4. Exclude All Indexing:

Exclude all indexing disables indexing for all properties within the container. This can be useful when you want to minimize storage overhead and do not require any query performance optimization:

// Define the indexing policy with exclude all indexing
IndexingPolicy indexingPolicy = new IndexingPolicy
{
    IndexingMode = IndexingMode.None
};

// Apply the indexing policy to the container
await container.ReplaceContainerAsync(new ContainerProperties(container.Id, partitionKeyPath)
{
    IndexingPolicy = indexingPolicy
});

5. No Indexing:

No indexing allows developers to retrieve data without any indexing overhead, ideal for applications that do not require query support:

// Define the indexing policy with no indexing
IndexingPolicy indexingPolicy = new IndexingPolicy
{
    IndexingMode = IndexingMode.Lazy
};

// Apply the indexing policy to the container
await container.ReplaceContainerAsync(new ContainerProperties(container.Id, partitionKeyPath)
{
    IndexingPolicy = indexingPolicy
});

Azure Cosmos DB provides flexible indexing policies that empower developers to optimize query performance according to their application requirements. In this article, we explored various indexing options, including opt-in, opt-out, composite indexing, exclude all, and no indexing, along with practical code examples. Choosing the right indexing strategy is essential for achieving efficient and scalable data retrieval in Azure Cosmos DB. Consider your application's needs, query patterns, and storage constraints to select the most appropriate indexing policy for your Cosmos DB containers.

Thursday, April 15, 2021

Azure Series : Cosmos DB : Enhancing Query Performance with Azure Cosmos DB Indexing in .NET Core: Practical Code and Data Examples

 In modern applications, query performance is crucial for providing a seamless user experience. Azure Cosmos DB, a globally distributed NoSQL database service, offers indexing capabilities to optimize query performance. In this article, we will explore practical code and data examples of how to leverage Azure Cosmos DB indexing in .NET Core applications to enhance query performance.

Setting up the Environment

Before we begin, ensure you have the necessary prerequisites installed:

  1. Visual Studio or Visual Studio Code with the .NET Core SDK.
  2. Azure Cosmos DB account and connection string.

Step 1: Create a .NET Core Project

Open Visual Studio or Visual Studio Code and create a new .NET Core project. Select the appropriate project template based on your application's needs.

Step 2: Install Azure Cosmos DB NuGet Package

In the NuGet Package Manager Console, install the official Azure Cosmos DB SDK for .NET Core:

Install-Package Microsoft.Azure.Cosmos

Step 3: Connect to Azure Cosmos DB

In your .NET Core application, establish a connection to your Azure Cosmos DB account using the CosmosClient class:

using Microsoft.Azure.Cosmos;

const string cosmosDbConnectionString = "YOUR_CONNECTION_STRING";
CosmosClient cosmosClient = new CosmosClient(cosmosDbConnectionString);

Step 4: Define and Configure Indexing Policies

Decide whether you want to use Automatic Indexing or Manual Indexing. For Manual Indexing, define and configure the indexing policy for your container:

// Define the indexing policy
IndexingPolicy indexingPolicy = new IndexingPolicy
{
    Automatic = false, // Set to true for automatic indexing
    IndexingMode = IndexingMode.Consistent,
    IncludedPaths = new Collection<IncludedPath>
    {
        new IncludedPath
        {
            Path = "/*" // All properties will be indexed
        }
    }
};

// Create or retrieve the container and set the indexing policy
Database database = await cosmosClient.GetDatabase("YOUR_DATABASE_ID");
Container container = await database.GetContainer("YOUR_CONTAINER_ID");
await container.ReplaceContainerAsync(new ContainerProperties(container.Id, partitionKeyPath)
{
    IndexingPolicy = indexingPolicy
});

Step 5: Insert Sample Data

Insert some sample data into the container:

public class SampleData
{
    public string Id { get; set; }
    public string Name { get; set; }
    // Add more properties as needed
}

// Insert sample data into the container
SampleData data1 = new SampleData { Id = "1", Name = "John Doe" };
await container.CreateItemAsync(data1);

SampleData data2 = new SampleData { Id = "2", Name = "Jane Smith" };
await container.CreateItemAsync(data2);

Step 6: Execute Queries with Indexing

Now, let's execute some queries using the indexing strategy:

// Query for items with a specific Name property
string query = "SELECT * FROM c WHERE c.Name = @name";
QueryDefinition queryDefinition = new QueryDefinition(query).WithParameter("@name", "John Doe");

FeedIterator<SampleData> queryResultSetIterator = container.GetItemQueryIterator<SampleData>(
    queryDefinition, requestOptions: new QueryRequestOptions { PartitionKey = new PartitionKey("YOUR_PARTITION_KEY_VALUE") });

List<SampleData> results = new List<SampleData>();
while (queryResultSetIterator.HasMoreResults)
{
    FeedResponse<SampleData> response = await queryResultSetIterator.ReadNextAsync();
    results.AddRange(response.Resource);
}

// Process the results as needed

Azure Cosmos DB indexing is a powerful tool to optimize query performance in .NET Core applications. By strategically using indexes, you can reduce data retrieval times, minimize resource consumption, and improve overall application responsiveness. The code and data examples presented in this article demonstrate how to connect to Azure Cosmos DB, define indexing policies, insert sample data, and execute queries using the indexing strategy. Incorporate these practices into your .NET Core applications to leverage the full potential of Azure Cosmos DB and deliver an exceptional user experience.